Friday, October 30, 2015

Gilding the Lily..October Mood Board Challenge

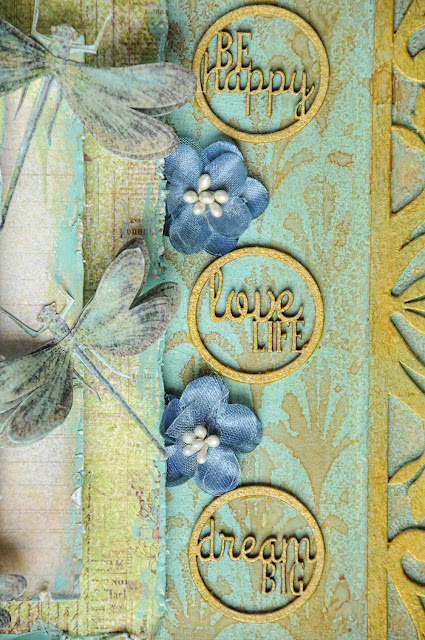
 Welcome to the Dusty Attic October Mood Board Challenge. It amazes me, what just a few colors can do to a project. My inspiration from the Mood Board came from the words..Glow and Heaven..and the color Gold. I added the darker blue for a bit of contrast. I was going for a gilded frame look again. I achieved it using the larger piece in the Garden Frame set. I also wanted it to look like the frame was carved out of the background and that was easy to achieve. See closeups below. To prepare my background, I mounted white card stock onto a piece of corrugated cardboard, then I painted the whole paper with Dusty In Colour Mountain Meadow and let it dry completely.


In order to get the feel that the chipboard was a wooden inlay, I coated the back of the frame chipboard  with a layer of texture paste.  Not to thin, but not to thick. I laid the chipboard onto the background and pressed down gently until the texture paste squeezed out the sides a teeny bit and I let it dry. Then I painted it with Mountain meadow.


Once it was entirely dry, I used the Mountain meadow and sealed the edges of the chipboard by brushing the paint into the edges of the chipboard paying special attention to the nooks and crannies, until you could not see texture paste or the edges of the chipboard.


This made it look like the chipboard was carved out of the background.  Once I was satisfied that all of the edges were totally sealed, I placed the Dusty Attic Fan stencil in the middle and lightly sprayed the entire layout with Lindy's Stamp Gang Glory of the Seas Gold. Then using a gold wax medium, I rubbed it over the chipboard until I got the coverage I wanted.


I painted my printed dragonflies with a bit of the Mountain Meadows paint watered down with water. Using it full strength, I rubbed it on the edges of the paper layers under the photo. I used gold on the photo.At the very end of my post, I added a file of the dragonflies I created. Feel free to save it to your computer to print them out yourself. I used 2 of the same size, just cut out the wings of one of them and layered it onto the whole one. Lift the wings for dimension. I ran out of vellum, but imagine the top layer in velum!!


 I also rubbed the gold wax medium onto the word disks. I gave it a couple of coats and they looked like metal pieces. I used Rub'n Buff.


I tucked the Dusty in Bloom flowers under the photo layers and I layered some of them on my die cut flowers.

I simply love dragonflies!! And everything Dusty Attic!!  Thank you for joining me this month at Dusty Attic. I hope you were inspired to try a new technique and follow the mood board!! 


Dusty In Bloom Smokey Blue


Tuesday, October 27, 2015

Think Pink...Breast Cancer Awareness Month...The Dusty Attic

 Hello Dusty Attic Lovers. I wanted to do a pink layout this month for Breast Cancer Awareness month. My wish is that that by the time my sweet  Grand-daughter is a young adult, that we would have found a cure, so her generation will never have to deal with it. I see 2 Indian Feathers Representing Strength and Courage, A split circle vine that will one day come together to make whole again, and an arrow to battle the monster of breast cancer. This is in honor of all of the survivors, and in memory of the ones we have lost...
For the background,  I mounted a white piece of card stock onto a piece of cardboard for stability, then covered it with gel medium. After it dried, I used Lindys Stamp Gang color mists alternating with sprays of water until I achieved the color saturation and design I wanted. I did some masking using Gabrielle Pollacco's new stencil with Dusty Attic Texture Paste on random spots, and sprayed it again till the color fell into the cracks.For the background I used Lindys  Fuzzy Naval Peach, Magnolia Magenta Gold and Alpine Ice Rose Starburst Sprays.


I prepared the feather with a VERY light coat of white gesso. When it dried, I heat embossed embossing powder in  couple of layers in a couple of different colors. I then took a white wash coating of gesso and wiped it after applying it. This gave it a metallic look with a hint of patina created by age.


I created layers of distressed patterned paper, burlap, cheese cloth, and jute to mat my photo. I distressed the edges of the mat papers with my Zutter Distrezz It All. The mat papers are Prima Debutante.


Once the flowers were all placed on the layout, I dry brushed a bit of gesso over them as well to tie them into into the  layout. I used all Prima flowers from different collections on this layout.


Here is another closeup of the other feather showing more detail in the pattern. Since the embossing ink didn't touch the grooves, they stayed free of embossing powder, and the powder just blew away during the heating process leaving the detailed pattern of the feather intact. The wash of gesso settled in the grooves and it created an old worn metal look.I used Lindys Stamp Gang Hibiscus Rose Orange with a bit of Pumpkin Fiesta and Geranium Coral Blush embossing powders.


I heat embossed the Love This Arrow after it was primed with white gesso, then used Lindys Stamp Gang Hibiscus Rose Orange Embossing Powder. Sometimes I give it a second coat and that creates a deeper texture with the embossing powder.


Here is a detailed look at the layers of the photo mat. To achieve dimension and height, I adhered small pieces of corrugated cardboard between each layer. This technique is less expensive than using pop dots and I always have cardboard readily available. 


The Vine Frame was snipped in half and  heat embossed with Lindys Stamp Gang Hibiscus Rose Orange Embossing Powder after giving it a coat of gesso. This allows the color to be more opaque than transparent.


Thank you for joining me this week. Grab some Dusty Attic chipboard to bring your projects to life.


Don't forget to join us at Dusty Attic this month using the October  Mood Board for a chance to win a fabulous  $100 Gift Voucher to the Dusty Attic website. The Dusty Attic has chipboard, stencils. texture paste and more!!

Dusty Attic Products:

Saturday, October 17, 2015

Lindys Stamp Gang...Drop Dead Diva...is Drop Dead gorgeous!!

Hey there Lindy's Lovers!!! I am here to tell you that Drop Dead Diva is drop dead gorgeous!! I had to use is once again for my second post this month. I concentrated on the  purples in my last post, and this time I used all of the colors in the set. I think that they are simply beautiful!! I created this Autumn layout dreaming of the colors I oh so love, when leaf peeping up north. The technique I used really turned down the brightness of the colors. Read on to find out how I did it.


I created some rolled roses for my simple flowers. After I cut out the spirals, I placed them on a non stick craft mat, misted them very lightly with water, then sprayed both sides with color. While they were still wet, I swirled them through the left over spray on the mat until all color was soaked up and the spiral cutouts were fully saturated with color. I did one color at a time using 3 of the colors in the set. Drop Dead Gorgeous Green, Prima Donna Purple,  and Sassy Sapphire Starburst Sprays.


For the leaves, I used a technique I learned from Lynne Woolgar for Lindys a while back. Except I added my own twist. Check out this tutorial. Fall Pumpkin. I painted  just the backs of silk autumn leaves using white gesso. Once they were dried, I sprayed the fronts of the leaves using the starburst sprays just like Lynne did. The twist, is I wanted to add a golden shimmer to the leaves and flowers, So I  sprayed them with Grab a Guy Gold Starburst spray for a rich golden shimmer.  The gold settled into the veins of the leaves beautifully.


You can see how the gold starburst spray tones down the brightness of the colors and adds a beautiful golden hue to the layout. I even sprayed the outer parts of the layout with Grab a Guy Gold once the layout was complete.


I sprayed some cheese cloth with  Prima Donna Purple and Sassy Sapphire, and added it to the back of the photo and around some of the spiral roses. 


I used  Sassy Sapphire embossing powder on the Dusty Attic chipboard circle behind the photo. I printed up some butterflies on white card stock, then after I cut them out I painted them with Prima Donna Purple Magicals diluted in a bit of water so the color was not intense. I wanted more of  a water color effect. Then adding a little bit of Grab A Guy Gold Starburst Spray finished them beautifully.


I used Drop Dead Gorgeous Green embossing powder on the Dusty Attic LOVE chipboard piece.


http://what-a-beautiful-mess.blogspot.com/

Limor Webber does it once again for Lindys Stamp Gang. The Drop Dead Diva color set is one of her best creations. The colors are simply stunning.  Visit the Lindy's Stamp Gang Store for all of your Drop Dead Diva color needs. Don't forget to join us for the October 2015 Color Challenge! 5 winners will be chosen to receive a $50.00 gift certificate to the Lindys Store!!
 Until next time...Put a little Lindy's color into your world.You wont be disappointed!!


Friday, October 2, 2015

Lindys Stamp Gang new Drop Dead Diva Collection and a new Color Challenge!!

Hello Lindy's Lovers!!
Welcome to another month of wonderful color!!! It is time for a new Lindy' Stamp Gang Color Challenge, but just as exciting, is the new addition to the already wonderful line up of colors !! Drop Dead Diva is another gorgeous collection by Limor Webber. Just imagine steely undertones of sweet silver in all of these beautiful new colors. Drop Dead Diva is simply fantastic. I have used all of the colors in this  collection with the exception of the Sassy Sapphire Starburst spray. (To be used in my next project this month). I primed my 2 pieces of background paper with white and clear gesso.I layered then, then went to town on sprays and texture paste. I added a tiny bit of Magicals powder to the texture paste to color it. Quite simple I must say!!


The Dusty Attic chipboard Dream Big is from the Mini Captions #8 set. I used Lindys Obviously black Embossing powder on it. I love the coverage of the powders.


The hand rolled roses were colored with Prima Donna Purple Magicals. I just sprayed a non stick craft mat with water, dropped a tiny amount of Magicals powder into the puddle of water, mixed it up with a small paint brush and dragged the spiral cut through the color. I then dried the spiral with a heat gun until it was 90% dry and then I rolled the roses. The pink roses were painted with Hi Maintenence Magenta Magicals.


Here is a closeup of the rolled roses. You can see the edge of silver.


This is a closeup of the pink flowers. I also colored the cheese cloth under the photo using a combo of Prima Donna Purple and Hi Maintenance Magenta


The leaves were colored with Bling-y Blonde Magcals  and Drop Dead Gorgeous Green Magicals.


Here is another view of the leaves and purple flower.


You can purchase the Drop Dead Diva Mega Set which includes the Sprays and the embossing powders. This is great kit to start with.

You can also add the Magicals from the same collection. I love the Magicals as you totally control the color. You can go from very bold and rich in color to very pastel and subtle in color. It is up to you. I love the color both ways.


Don't forget the Color Challenge this month. Stop by the Lindys Blog to get more inspiration from the designers. They always blow ME away and I am on the team!!! If you join our newsletter, you will be updated on the latest and greatest tips, tricks and trends. You will also receive special updates on sales. So join the NEWSLETTER NOW. See the side bar on the blog to join.