Friday, February 27, 2015

BoBunny***Smile Layout***

 Today, I bring you a layout of my dear friend Pam's mother. She sent me a couple of her photos to scrap. Her beautiful smile is what inspired this layout. BoBunny came out with 5 beautiful collections this season. I used a bit of Sweet Life, Garden Journal and Heritage Ancestors.


I fussy cut the small post cards from the paper, notched the top ends, punched a hole on top and strung some  string through the holes and created these sweet tags.


To create the tag that wraaps around the photo, I backed it with some chipboard for stability, placed  string through the holes and wrapped it around the photo, then tied it in a bow.


The rolled roses were free hand cut spirals and created with the new Hot Pink Double Dot paper.  Once the roses were rolled, they were topped with Glitter Paste in Blush,


The leaves were punched, rolled and inked. The flourishes that create the vine around the layout was created with the brand new Flourish Craft Die. YES!! BoBunny had dies. They are wonderful!!!


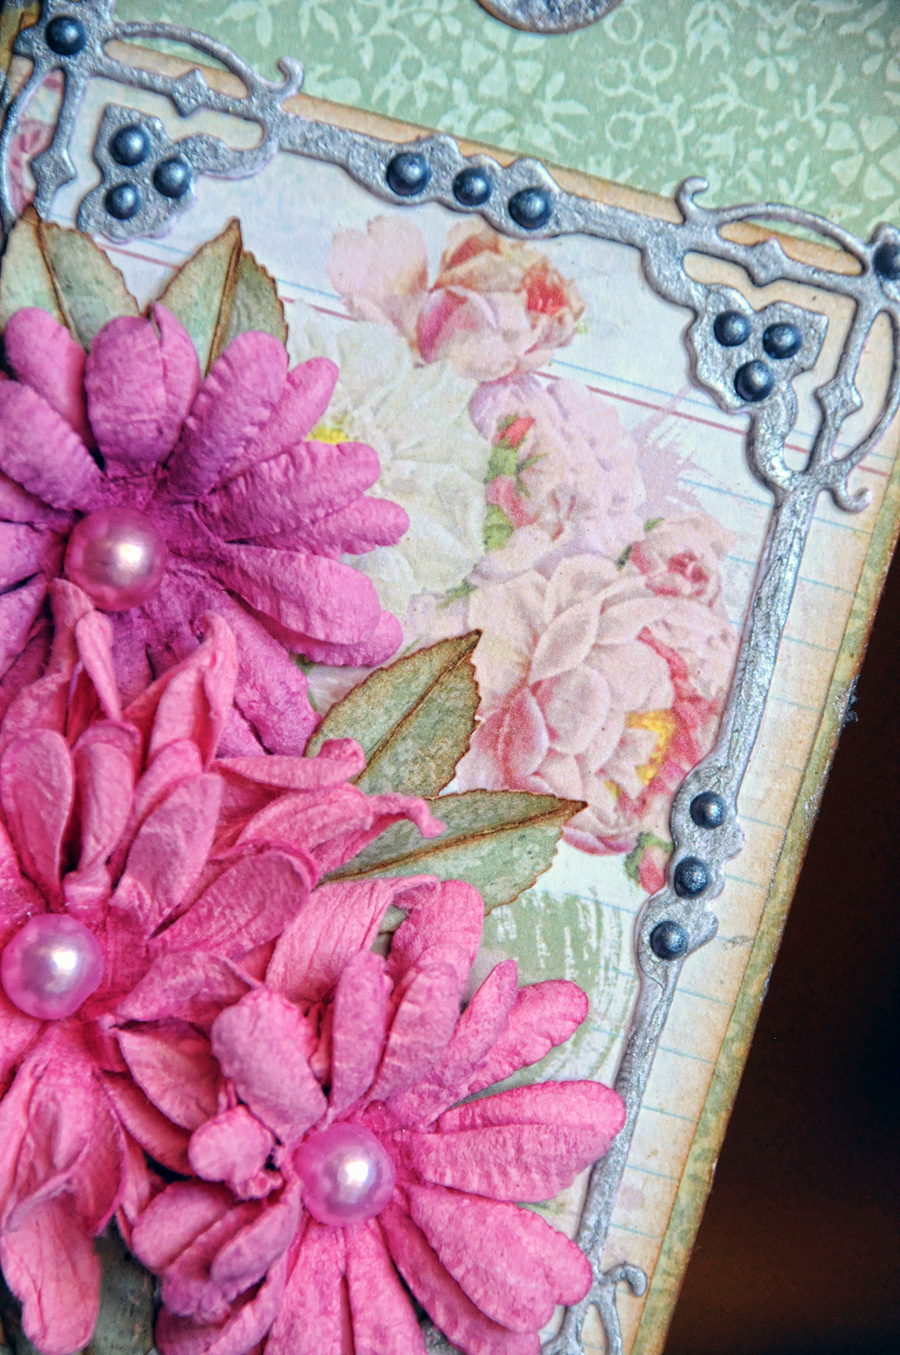
I used a piece of the Lattice Frame die and tucked it under the photo. Both of the butterflies are Noteworthy pieces. I adhere only the body to the layout and lifted the wings a bit.


This layout was created on a peice of 12x12 corrugated cardboard. I wet the edges, sprayed it with Lindys Stamp gang in Autumn Maple Crimson Starburst Spray and wrinkled it up a bit for texture.


I matted the whole photo area with a Large Bunny Doily.I Just sprayed it with Lindys Stamp Gang Autumn Maple Crimson Starburst spray.


BoBunny Products Used:
Patterned Paper: Garden Journal, Sketch: Heritage, Ancestors.
Bossoms: Blush
Glitter Paste: Blush
6x6 Paper Pad: Garden Journal
Double Dot Paper: Hot PInk
Doily: Large
Craft Dies: Flourish and Lattice Frame

Thursday, February 26, 2015

Dusty Attic February Mood Board

Good morning everyone! Today I share with you, the luscious colors of the February Mood Board that were used to create my layout. One of my favorite colors is purple and all the shades in between. So this Mood Board really excited me, because I got to work with my favorite berry shades. 

 I created this layout and used a 12x12 piece of corrugated cardboard as my base. I adhered a 12x12 piece of lavender cardstock to the base using ModPodge, then added a second smaller layer with a piece of brown cardstock . Once it was dry, I wet the edges and peeled back the cardstock taking the top layer of the cardboard with it, exposing the ridged part of the cardboard an wrinkled and tore it up a bit. I used Lindys Stamp Gang Moon Shadow Mist in Mooonlit Mulberry over the cardstock pieces. I sprayed the exposed cardboard edges with Moon Shadow Mist in Phantom Fuchsia.


The Dusty In Color acrylic paints are wonderful! I used the Lavender Blush to paint the Word Pack #4 "Moments" title. The paint is so thick and lush that it only takes 1 coat.


To color the Elegant Swirls #13, I used the smaller swirls from the  pack and used Dusty In Color in Raisin to paint them.


 I painted a piece of Corrugated Card for the photo mat, using Dusty In Color in Raisin. The Sweet PeaFrame Set was painted with Lavender Blush.


I tucked some Dusty In Bloom Flowers in Dusty Rose, into my handmade flowers.The wreath on this layout was actually a project I did for Heartfelt Creations. I thought with the colors, it was just perfect for this layout.


 I created the flower wreath a while back and thought I would incorporate it into this layout. I did recolor a piece of the the Circle Frame set in Dusty In Color in Hot Chocolate that I used for the wreath, then wrapped some twine around it and tied a bow. I topped the bow with another flower in Vintage rose.


Dusty Attic Products Used:


Till next time xoxo


Thursday, February 19, 2015

Mini Tag Album BoBunny

I am up on the BoBunny Blog this week with a  6x3 mini Tag album using the gorgeous Garden Journal Collection. The new metallic Pearlescent Pens are really versatile. I chose to use the Graphite to color my die cut frame and the tag holes to make them look like metal. The new metallic Pearlescent Pens are fabulous! I die cut my tags using Sizzix Tag and Bookplate die


 The new dies from BoBunny are fabulous!! I used one part of the Lattice Frame for my front and back covers. Once the die cuts were finished with the Graphite Pearescents Pen, I then dotted it to make it look like rivets. I used the Blush Daisy Blooms, and created the leaves by punching them out from leftover paper. I inked the leaves, rolled them for texture and tucked them under the flowers.


 I created multiple pages from the tags. Each one has a pocket for a folded card, and the other side is clank to add photos or journaling. I added a piece of twine to the holes on top.


The Daisy Blooms in Blush compliment the pink in the Garden Journal papers. I clustered 3 of them on the cover.


 The next few photos are of the inside pages.


 This is the journal opened up and showing bot the front and back covers. I punched holes on the side of the tags using my Cropadile and strung all of the pages together using 2 book rings.


 Thank you for joining me today. I just love making these sweet little journaling minis that can be used for a variety of reasons. This one may hold notes of flowers and plants in my garden and record this years beautiful bounty.
Till next time 
xo
Lisa

BoBunny Products:
Patterned Paper: Garden Journal, Pastel/Garden Journal
6x6 Paper Pad: Garden Journal
Chipboard: Garden Journal
Blossoms: Blush Daisy
Stencils: Cascade
Dies: Lattice Frame
Jewels: Double Dot Think Pink
Pearlescents: Graphite
Misc Me: Notepaper

Monday, February 16, 2015

Lindys Stamp Gang ***Gilded Mini Album***

I'm up on the Lindys Blog this week with a new project for you.  I love Starburst Sprays for the shimmer, I love Flat Fabios for the gorgeous saturated color and I love Lindy's embossing powders because you can emboss just about anything with it. I especially love how it embosses on metal and resin.  I used the variety of products on this 6x6 mini album trying to get a gilded look.
I sprayed white silk flowers with Rizzo's Rowdy Red Flat Fabios  and Autumn Maple Crimson Starburst Spray. The leaves were colored with Maidenhair Fern Green Starburst Spray.


  I heat embossed the corner filigree metal pieces that my wonderful friend Rae Moses sent me and the resin frame that I picked up at Michaels for $1.00. I used Queen Sheba's Silver on both pieces, then I sprayed it with Bayou Boogie Gold Starburst Spray.


I used some Zipper Stop Seam Binding to create the ties. I sprayed them with  Rizzos Rowdy Red Flat Fabios  and Autumn Maple Crimson Starburst spray. The wonderful thing I love about spraying fabric or ribbon with Lindy's, is that it does not stiffen the fabric or ribbon like some of the other sprays out there.The ribbon stays soft.


The entire mini album was created from corrugated cardboard that I just adhered the patterned paper to. I followed a tutorial from Frank Garcia for the binding technique to put the pages together, then I covered the spine using a technique I learned years ago from creating Post It Note covers. I just adapted it to create my spine and slipped the album in.


 I used some Tim Holtz clasps to tie my ribbon to. There is no need to untie the ribbon. Just unclip  the clasp from the cover. Once everything was in place, I sprayed the whole outside of the album with the Bayou Boogie gold spray.


Thank you for joining me today. Don't forget to check back often on the Lindys Stamp Gang Blog as the Lindy's Designers dazzle you with their art!! Join us on Lindy's Facebook Page for the latest and greatest. And subscribe to  Lindy's Newsletter so that you don't miss the latest and greatest when it comes to products, tips, techniques and Specials.Till next time, use Lindys to color your world.

Lindys Products Used:
Rizzos Rowdy Red Flat Fabios Spray
Autumn Maple Crimson Starburst Spray
Bayou Boogie Gold Starburst Spray
Maidenhair Fern Green Starburst Spray
Queen Sheba's Silver Embossing Powder

Tuesday, February 10, 2015

BoBunny Wild Card Mini Treasures mini Book

 I love doing 12x12 layouts. That's my thing, but what comes close are mini albums, but my new love is Foto Folios by Kathy Orta Files (Paper Phenomenom) . She has the most amazing patterns. Bo Bunny Collections are perfect in creating them because besides the card stock and patterned paper, there are all of the other wonderful coordinating embellishments  to add to your projects. You wont need anything else. For this project, I took the pattern directly from Kathy's book, Interactive Mini Scrapbooks. I used the Mini Treasures tutorial. Kathy Orta Files herself often uses BoBunny for her projects and even references BoBunny in her book. I created this folio for my husband to display some of his car restoration projects. He has a talent like no other. His work deserved a special place to display his best. For this project I used the awesome Wild Card Collection. Perfect for your masculine projects.


 this is the inside. The pockets are filled with tags and slide outs. There is plenty of real estate for photos and journaling. Once I constructed the base of the folio, it was covered with Double Dots cardstock. The patterned paper was then layered on the top. Pockets were created then the tags and pullouts to slide in all of the nooks and crannies


Here is a view f all of the tags and pull outs once they are out of the pockets of the folio.


 Here is a close up of the inside. There are top pockets, side pockets and even pockets on the inside of the fold.


You know me and my love for feminine flowers, I can't do something without the flower element, so I decided to something a  tiny, little, masculine. So I created Rosettes because they aren't so frilly. I think they were perfect for this project. For the title design, I fussy cut some of designs on the paper, backed it with thin chipboard and layered them with Pop Dots to create the dimensional element on the cover. I cut the layered chipboard dice in half and used it for my rosette middles. The other is a brad.


 This is the back of the album. I used a piece of the Noteworthy


Bobunny Products Used:
Patterned Paper: Wildcard, Cashout, Billiards, Dominos, Zoom, Speedway/Wildcard
Noteworthy: Wildcard
Card Stock: Double Dots Stripes Collection pack
Brads:Wildcard
6x6 Paper Pad: Wildcard
Layered chipboard: Wildcard
Chipboard: Wildcard
 The book I used from Kathy Orta Files. 


Thursday, February 5, 2015

Hello Winter Mini Album ***BoBunny***

 While the snow keeps on piling up in the North, I am staying quite content with my 70's weather down on he Gulf Coast of Florida. But that doesn't mean I have a little bit of Winter Spirit in my heart. I decided to create a little Winter Themed mini with the wonderful Altitude Collection. I will collect old snow/winter photos of my youth growing up on Long Island to put in this mini. Yup, digging them out just like snow!! I die cut the postage stamp shape for my album base from A Sizzix die.I bound the pages by punching holes with my Cropadile and held it together with a Book Ring.


Here is a closeup of the cover. I used the Layered Chipboard for the title. I underlined the title with jewels and layered some buttons and a pearl to place inside the chipboard slide. One flower was all the cover needed.


On the ends of each page, I placed a tab that was cut from the Noteworthy designs, or one of the stickers, that I backed with scrap paper to give it a finished back.


 The next few photos are of the inside pages. I left room on some of the pages for photos, journaling or ephemera.


 I fussy cut some of the tags from the paper and backed them with the paper backing that the layered chipboard came in and the Film Strip. I punched holes in the tags, layered them and added them to the book ring.

 The end... The back cover was adorned with Noteworthy and a Bloom.I had some ribbons to match the papers and strung them through the book ring. BoBunny has Carded Ribbon to match all of their papers.

Thank you for joining me today. Dont forget to check out the BoBunny Blog  our Facebook Page, our Pinterest Page, Twitter and our You Tube Channel,  for tons of tips, tricks, techniques, tutorials and just see the lovely art by the Design Team. There is always a ton of inspiration. Stay tuned as I design with our February sketch for my  next project next week.


BoBunny Products Used:
Patterned Paper:Flurry, Snowflake/  Altitude
Buttons: Altitude
Jewels: Double Dot Aqua
Blooms: Denim Blue Daisy
Wood Shapes:
Adhesive Film Strip: Altitude
Layered Chipboard: Altitude
Noteworthy: Altitude


Sunday, February 1, 2015

Lindys Stamp Gang February 2015 Color Challenge

 Welcome to Lindys Stamp Gang February 2015 Color Challenge! The  colors this month are oh so yummy. I think of a berry patch with these luscious colors. The inspiration photo also gave me the idea to include it in the layout, and the theme would be about destination. The photo reminded me of the dreams and aspirations my husband and I talked about on the night of our wedding. The 2 of us, hanging out in his 57 Chevy just dreaming away... So this Color Challenge evoked a lot of good old memories for me. I hope it does the same for you.


I used background patterned paper that was of old maps. I found the paper pad at Hobby Lobby. I did some masking with molding paste to give it a little texture. Once it was dry, I sprayed the background with Flat Fabio Caribbean Blue and a small bit of Royal Peacock Fire Glitz.


I painted the frame with white gesso for the base. When dry, I scraped the bottom frame with a combo of Caribbean Blue and Frolic in The Forest Black.Then I did a tiny bit of heat embossing with Hyacinth Blue Jade on the top frame, then used clear crackle coat on the top layer.


The flowers were stripped from a stem I bought at Hobby Lobby for 1.00. They were a cream color. I sprayed them with the Flat Fabio Caribbean  Blue and when they dried, I sprayed the very inner part of the flowers only, with Bouginvillea Fuschia and  Pretty in Pink Pink Starburst Spray. The  spray bled into the flower petals to a gorgeous lavender color. When it was dried once again, I sprayed the very inner part again for a second coat of Pretty in Pink Pink. I love the way the spray bled. It created an "extra" petal look.


 I die cut the tags with my Alterations Tag and Bookplate die. I cut a thin chipboard along with the patterned paper. I adhered the paper to the chipboard for strength and dimension. I layered them on the background and placed the frame over them. The  journaling was printed in Photoshop, cut out then adhered to the tags. I used a paintbrush to outline the words using Frolic in The Forrest. I flicked the Frozen Jack Frost Starburst spray all over the layout being careful not to get it on the photo, frame or flowers.


 I have a collection of silver and gold metal trinkets. I heat embossed this silver flower with Hyacinth Blue Jade Embossing powder. It takes exceptionally well to the metal and leaves gorgeous color on it. I topped it with a half pearl embellishment. I painted the tag ties as well with the Frolic In the Forest Black.


Thank you for joining me today in another round of Lindys Color Inspiration. Join us this month  for the February Color Challenge. 
 Use a minimum of two (2) Lindy’s Stamp Gang products, and link them to our online store. You are welcome to add neutrals, white, black, gray and brown, but please stick to the colors in the color graphic.
***There will be five (5) winners of $50 Gift Certificates to the store!
Link your projects HERE to enter your project!!