Wednesday, December 31, 2014

I Am a 2015 Dusty Attic Designer


  I can finally let out one of my huge secrets I have been keeping for a few weeks! I was about to bust doing this happy dance by myself these last few weeks!!!! This is truly a dream come true for me...I was invited to join the Dusty Attic Design Team for 2015!!!!! (((squeeling with delight))) Jennifer Hedger and the Team have been sooooo warm and inviting...So how do I really feel??? Shock and Awe is the only way to describe it!! 

http://dustyatticblog.blogspot.com.au/2015/01/happy-2015-lots-of-news.html


and another
 BIG CHANGE...
 
Dusty Attic is bringing to you this year is now a
MOOD BOARD
(instead of the monthly sketch)
with a brilliant prize of
$100 gift voucher
 
 So come and visit the blog for all of the exciting news and details of what 2015 is in store for you at Dusty Attic. 
 
 
xoxo
Lisa 
Everyone have a wonderful, safe, healthy, happy and creative New Year!!!!
 

Lindy's Stamp Gang Listen To Your Heart

 I love that Lindy's Stamp Gang gives you a gorgeous color  palette every  month for the Color Challenge, so there is no guessing. But you are free to use the Lindy's Colors you have on hand. With so many colors to choose from, it is so easy. As December comes to an end, I am sharing my last Lindy's project of the year. Another winter themed layout. I love the wintry blues in the palette, but the touch of gold and the pop of red, really warm things up. I wish you could see the shimmer in real life. The photos just don't to it justice. Once again, I used a 12x12 piece of corrugated cardboard as a base, and simply adhered a piece of 12x12 cardstock to it using Mod Podge. I brushed the Kraft with gesso giving it  light coat, then used the sprays in  while after the gesso was dried, I did some masking using molding paste and did some stamping. Under the frame I used a small piece of corrugated cardboard stripped of most of the top layer and treated it as I did the background. I touched up the finished background with a touch of gesso here and there.


The flowers were sprayed with Rizzo's Rowdy Red Flat Fabio spray. I die cut some leaves and sprayed them using T-bird Turquoise then topped it off with Azure-Sea-Asters.


I sprayed the butterfly with Rizzo's Rowdy red, then heat embossed it with Starbright Gold Green embossing powder.


I used my Silhouette to cut the corner vine from some Kraft paper. I painted it with white gesso, then sprayed it with Tibetan Poppy Teal. You can see bits of spackling tape (purchased at Home Depot) on the layout as well. I use it for added texture. You can see the closeup of the edges of the layout curled back, revealing the corrugated cardboard underneath.


I found a great little silver resin frame at Michaels for 1.00. I gave it a good coat of gesso and let it dry. Then I heat embossed it with Starbright Gold Green then sprayed it with  Tibetan Poppy Teal.


Here is a closeup the frame. I love the look of patina!! That is the look I was trying to achieve. With the bits of blue and green in the Tibetan Poppy Teal, it came out perfect over the gold!! I love how some of the color just settled into the crevices of the frame.


You have util midnight tonight  to get your December Color Entries in!!! CLICK HERE FOR THE RULES
I have absolutely loved my last 2 terms on the Seasonal Design Team this  past year! What a glorious colorful ride it has been!!!! Thank you Tracey and Gang for a great ride!! I wonder where 2015 will take me??? We shall soon find out!!! Stay tuned for some really exciting news!!!
xoxo
Lisa

Tuesday, December 30, 2014

December 2014 Heartfelt Creations Alumni Blog Hop ***Update Winner***

 The winner of the Blog Hop is Cathy Hanes!! Woo Hoo!! Claim tyour prize by emailing emmalou@heartfeltcreations.us within 72 hours!

Happy to see you visiting here on the last Heartfelt Creations Blog Hop of 2014!! If you arrived from  the very talented Loretta's blog, then you are on the right track. I hope you have been inspired so far. I decided to do something a little different this time. I wanted a small decorative wreath to hang in my Scrap  room. I adore the color purple. So I did what I do best. FLOWERS!!!!  placed them on  wreath. I used  a circle piece from Dusty Attic.


For the flowers I used the Sun Kissed Fleur Cling Stamp Set. I die cut all of the different sizes from large to tiny using the Sun Kissed Fleur Die. I love the stamps with coordinating dies. It makes life so much easier when making flowers!!


I sprayed the flowers with Lindy's Stamp Gang Starburst spray in Tea Pot Purple, then used a spritz of Royal Peacock Fire over it. I layered 3 or 4 flowers from largest on the bottom, to smallest on the top. I crumbled the flowers a bit for texture, then placed  rhinestones in the middle of each one. I used some Stickles around the middles as well.


The viney leaves were all stamped and diecut  using the Classic Leaf PreCut Set and Open Leaf PreCut Set and sprayed with Lindy's Starburst spray in Frosty Forrest Green.I crumbled them a bit while they were still wet for texture.


I hope you are enjoying today's Blog Hop. Now hop on over to Linda's Blog to continue on the journey!
Don't forget to check back on Saturday January 3rd to see if you are the winner of a $25 gift certificate to shop at Heartfelt Creations!!

Order of The Hop


Heartfelt Creations Products used:
Classic Leaf PreCut Set
Open Leaf PreCut Set
Sun Kissed Fleur Cling Stamp Set
Sun Kissed Fleur Die

Monday, December 22, 2014

BoBunny Christmas Collage Flip Book

 This is my last BoBunny project for December. Then, we eagerly await the new collections ready for CHA!! I am so excited!!
I thought I would create a portfolio for my Christmas photo's this year. So I used one of BoBunnys newest Christmas collections "Christmas Collage".  I have a wonderful book by Kathy Orta called Interactive Mini Scrapbooks.
I followed the pattern for the Flip Book. This is a wonderful mini album for those special photos.


I even followed the instructions to make the unique closure for the album.


The closure wraps partly around the album. I used the Chocolate Pearlescents  to rub along the edges of the album. Once it was dry, I sprayed the whole outside of the album with the Gold Glimmer spray. Then I used the Gold Glitter Paste to rub over the album in different places. Even over the BoBunny Jewels.


This is the back of the album. I used the beautiful piece of  wood shapes from the Iron Works Collection. Then I cut out the picture of Santa and added  it in the middle.


 This is the album opened up. It is a trifold with pockets and a waterfall feature in the middle. 


This is a closeup of the cover to the waterfall feature. There is lots of room for photos and journaling.
I simply adore the BoBunny Buttons. I added a string to the star button.


Here is a close up of the wood shape.


There are a total of 7 flip pages in the waterfall. Each one is covered with a piece of the patterned paper. I rounded the corners with my Zutter Corner Rounder. I love it because it even goes through heavy chipboard and  plastic. 


I hope your holidays are Merry and Bright!! I look forward to an  awesome 2015 Creative Year!! I hope to inspire, as others have inspired me.
xoxo
Lisa

BoBunny Products Used:
Patterned Paper: Double Dots 12" Chocolate Stripe, Christmas Collage, Festive, Christmas Collage     Glad Tidings/Christmas Collage
Chocolate Pearlescents
Glitter Paste Gold
Wood Shapes: Elegant, Iron Works, That's Life,
Blossoms: Wildberry Daisy
Jewels: Ruby Red
Buttons: Christmas Collage
Layered chipboard: Christmas Collage.

Saturday, December 13, 2014

Lindys Stamp Gang December 2014 Color Challenge


 Welcome to Lindy's Color Challenge for December. and what  way to end the year. With a gorgeous color palette. The blues of winter, the gold the sun shines on winter, and the pop of red for that element of surprise. For my layout I used the December 2014 Color Challenge MEGA Set
The sprays and embossing powders are amazing.  I started by mounting  piece of white card stock to corrugated cardboard using Mod Podge. I gave it a spray with Azure Sea Asters, then edged it with
Tibetan Poppy Teal.
I mixed some white molding paste with some gesso to create a soft paste that I used to mask my background. Then I sprayed Opal Sea Oats for the gold sheen.


Here is  closeup of the layered photo. I heat embossed the edges of the photo using Starbright Gold Green embossing powder. I used the same color on the embossed die cut snowflakes.


Here is  closeup of the masking on the background.


You can see the layers I used. I mounted my square cuts onto corrugated cardboard,then layered them under the photo.


I did some stamping for added texture. 


 The leaves were die cut and sprayed with  Tibetan Poppy Teal and topped with  quick spray of  Azure Sea Asters for the gold sheen it leaves behind. The flowers were sprayed with Rizzo's Rowdy Red. I kissed them with a little white acrylic paint.


Thank you for joining me today for another color filled Challenge!! Please join us this month for  chance to win a 50.00 gift certificate to the Lindys Stamp Gang online store. Check it out, follow the rules and have fun with color!! Then enter your link and view the Linky Tools list HERE...
Good Luck!!
Lisa
xoxo

Wednesday, December 10, 2014

Lindys December 2014 Color Challenge

 
Have you seen Lindy’s Color Challenge for December? What a way to end the year! The blues of winter, the gold of the sunshine on winter, and the pop of red for that element of surprise. A gorgeous color palette. For my layout I used the December 2014 Color Challenge MEGA Set.
The sprays and embossing powders are amazing!  I started by mounting a piece of white card stock to corrugated cardboard using Mod Podge. I gave it a spray with Azure Sea Asters, then edged it with Tibetan Poppy Teal.
I mixed some white molding paste with some gesso to create a soft paste, that I used to mask my background. Then I sprayed Opal Sea Oats for the gold sheen.
 
Here is  closeup of the layered photo. I heat embossed the edges of the photo using Starbright Gold Green embossing powder. I used the same color on the embossed die cut snowflakes.
 

Here is  closeup of the masking on the background.


You can see the layers I used. I mounted my square cuts onto corrugated cardboard,then layered them under the photo.


I did some stamping for added texture.


The beautiful leaves were die cut and sprayed with Tibetan Poppy Teal, and topped with a quick spray of  Azure Sea Asters for the gold sheen it leaves behind. The flowers were sprayed with Rizzo’s Rowdy Red. I kissed them with a little white acrylic paint.


Thank you for joining me today for another color filled Challenge!
 Please join us this month for  chance to win a 50.00 gift certificate to the Lindys Stamp Gang online store. Check it out, follow the rules and have fun with color!! Then enter your link and view the Linky Tools list HERE
Good Luck!!
Lisa

Blue Fern Studios Last Projects of 2014.

Welcome To December. I leave you with the last of my Blue Fern Studios projects for the year. That doesn't mean I will stop using the gorgeous chipboard and papers though!! This has been an incredible year for me designing for Blue Fern Studios. I want to take the time to thank Leslie, Patter, Valerie and my teamies!!! You have all been so wonderful to work with. I have really enjoyed my time with Blue Fern Studios and feel very fortunate to have been with the company since its inception.
The new collection Sanctuary is simply divine. Each one of my projects today  have been created with the new collection. All of the colors I used is from Lindys Stamp Gang.

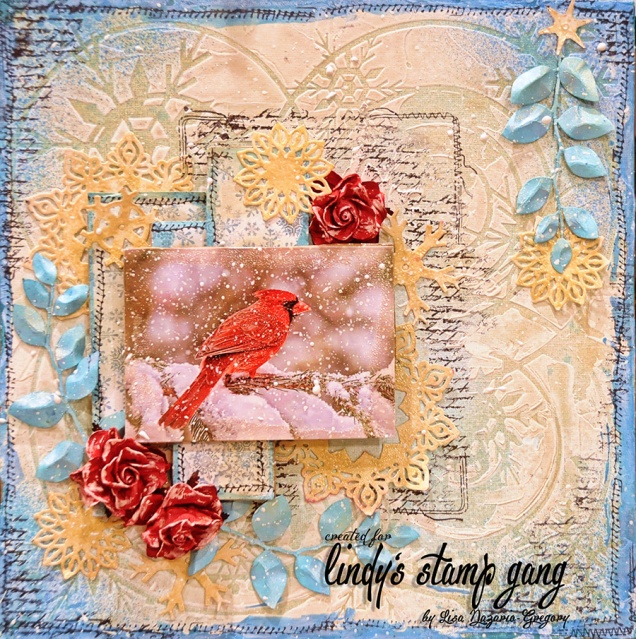
For this first layout I used Botanical Garden from the Sanctuary collection.I mounted the paper on corrugated cardboard using Mod Podge, then edge distressed it to revel the cardboard. I used Lindys Starburst Spray in Azure  Sea ASTERS to add the blue to the background. I used Opal Sea Oats on the edges.


 I used the Grunge Frames chipboard, misted it with water and when it was soaked I peeled some of the layers on the chipboard, crunched it  bit (very carefully) and dried it with my heat gun. I primed it with gesso, and colored it with more mist.


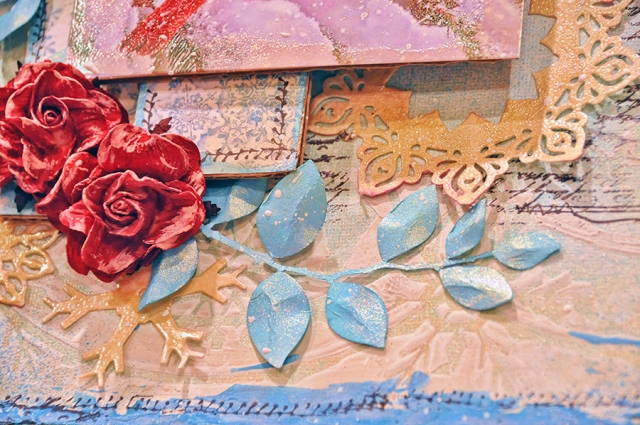
 The leaves were die cut and sprayed with Lindys Stamp  Gang in My Mojito Green, then Opal Sea Oats for a gold sheen.


I was  saving a stash of single layer Prima Flowers that I just colored with Lindy's  and layered them for fullness.


I just love the corrugated cardboard peeking through from under the photo.


For my next Layout, I used  Garden Plaza for my base paper. I used Lindy's Stamp Gang Starburst Spray in Bougainvillea Fuschia to further enhance the pinks in the paper and did some stamping.


I cut the Roman Clock Set Small in 2 pieces and used it on opposite ends of the layout. I inked it in black. The leaves were die cut and colored with Lindy's in My Mojito Green and enhanced with Magicals then topped it off with a bit of Opal Sea Oats for a dusting of gold. The roses were white and sprayed with Lindy's Stamp Gang Starburst Spray in Bougainvillea Fuschia.


In 
the 
garden
 of 
thy
 heart, 
plant 
naught
 but
 the 
rose 
of 
love.

 I used pieces of the BFS Checker Bits, and the title is from the Arrow Words set which I inked black and added some mist to match the pinks in the layout. The frames were die-cut from Bird Song Melody in the Sanctuary Collection. I also cut the frame from corrugated cardboard and adhered the die cut to for added depth.


I simply adore these Prima Flowers. The color was awesome, but I made it spectacular with Lindy's Starburst Spray in  Bougainvillea Fuschia.  


 Here is a closeup from The Story arrow words set chipboard.


For my next project, I used the Blue Fern Studios December sketch for the design.


The card is a small space, but the sketch is so versatile.The chipboard pieces I used are Jasmine Collage and   arrow Words. I split the Jasmine Collage in have diagonally to  spread it out a bit.


I misted the flowers with Lindy's Moon Shadow Mist in Treasure Island aqua and Starburst Spray in Tibetan Poppy Teal. I  primed the Smile arrow word then sprayed it with Tibetan Poppy Teal  as well.


 This is the bottom half of the Jasmine Collage chipboard.I primed it with gesso, then sprayed it  with Tibetan Poppy Teal. The die cut leaves were colored with My Mojito Green and enhanced with Magicals then topped it off with a bit of Opal Sea Oats.


This is a view of the top half of the Jasmine Collage.


Don't forget to join the Blue Fern Studios December Sketch Challenge.
Thank You for joining me today far my reveal. Thank you for all of the support and love you have given me throughout the last couple of years.I have some exciting Design changes  coming in 2015 and I am very excited about it!! Details coming soon!!!
I hope your Holiday's are Merry and Bright!!
 xoxo
Lisa